|

Homemade gifts always make such a lasting impression - your friends, employees and colleagues
will consider themselves very lucky to receive this kind of gift from you! If you're not sure where to start, ask yourself
if there is something you make that always brings raves. Or, see some personally tailored ideas (below). Remember that it's
not the size or cost of the gift that matters. The fact that you took time from your busy schedule to assemble these gifts
will speak volumes
Make It Special!
I could go on and on, but here are just a few accessory ideas to help you create your own
Christmas gifts and baskets

For the avid reader: Great book (perhaps one featuring fabulous food descriptions such as Under the Tuscan
Sun), distinctive or personalized bookmark and a featured food item from the book
For the tea or coffee lover: Basket with selection of teas or coffees, pretty new cup or mug and homemade
mini-loaves of various nut breads or cookies.
For the pasta lover: Homemade pesto or tomato sauce, gourmet olive oil and selection of interesting pastas
For those who love to cook and entertain: a subscription to a cooking magazine such as the Betty
Crocker recipe magazine.
Wrap It Up
From simple to elaborate, whimsical to the obvious, there are just reams and rolls of gift-wrapping
possibilities
Begin by looking at what boxes, cans, bottles or other containers you can recycle. Foil, gift wrap, wallpaper,
fabric and linen or paper napkins can easily cover the outside of a vegetable can; line the inside with colored plastic wrap.
Or sponge paint or spray the containers with faux finishes before filling with goodies
If you are craft inclined, make sure to have a hot-glue gun handy, and then let your creativity lead the way.
Ornaments, silk seasonal flowers or evergreens will stay put even when those package peekers wrestle through the hidden presents.
Embellish boxes with buttons, old jewelry, coins or that odd collection of keys, nuts and bolts
Let kids get involved by wrapping gifts in plain white paper and then letting them color, sticker or stamp
to their holiday heart's content. Or they can decorate the paper before the gift is wrapped.
Make Your List and Check It Twice
With such a fun, festive and aromatic time of year, try to avoid rushing or hurried attempts
that create frustration and stress.
Make certain that you are ready and prepared well in advance of your project. Look over the recipe or instructions
for all ingredients and supplies.
Perhaps you can make some items and foods ahead--look for shortcuts such as freezing homemade goodies in advance.
Gather family or friends to share and "bake and make" goodies and crafts together.
Enjoy the time you put into making your gifts--light several candles in your kitchen or wherever you're crafting
and play holiday music you like.
Holiday Gifts from Your Kitchen Menu
For the hostess:
A beautiful Cinnamon Apple Wreath or Candy Cane Planter
For your elderly relative, neighbor or friend:
Homemade cookies on a
serving tray or in a tin for them to share when guests drop by. Consider ethnic cookies from their childhoods, such as Rosettes, Krumkake or Pizzelles
For your kid's teacher:
Gift certificate for a movie, video rental or lunch at
a local spot in a small gift bag filled with Reindeer Chocolate-Coated Pretzel Rods made by the kids.
For your favorite cookie monster:
For your mail carrier, hairdresser or almost
anyone on your list, sometimes the traditional box of holiday cookies is just perfect and certainly always appreciated. Try
Ultimate Spritz, Stuffed Stockings, Peppermint Snowball and Snowflake Cookies
For the snack attacker:
Do you know someone who loves salty, crunchy snacks? Then
make up a gift box with a batch or two of our homemade munchies: Reindeer Snack or Herbed Cashew Snack Mix
For the butcher:
(the meat lover on your list): Some great steaks, cookbook about
grilling and loaf of homemade bread such as Honey-Whole Wheat Bread
The baker:
Candy Cane Coffee Cake wrapped on a pretty serving plate. Or make New York Cheesecake in
a new springform pan.
And the candlestick maker:
(those who love candles): Delicate
Icing Snowflakes wrapped in a holiday gift bag.
May these gifts from your kitchen give you and yours pleasure throughout the holiday season.
Happy Holidays!
Holiday Gifts from Your Kitchen Recipes!

Cinnamon-Apple Wreath
Adorn your door with this festive holiday wreath and welcome your guest with apples, cinnamon
spice and everything nice.
Prep: 1 hr 40 min
Start To Finish: 7 hr 40 min
Makes 1 wreath
6 small apples, 2 1/2 inches in diameter
Lemon juice or Lemon-lime soda pop
Wire rack
Spray varnish, if desired
6 cinnamon sticks, 10 inches long
Straw wreath, 10 inches in diameter
2 yards 3/4-inch ribbon
8 (3 1/2-inch) cinnamon sticks
Glue gun and glue sticks
Silk leaves
1. Heat oven to 200ºF. Cut apples lengthwise from stem end through
core into 1/4-inch slices. Dip apples into lemon juice to prevent browning; place on wire racks. Carefully place wire racks
on oven rack. Bake 4 hours.
2. Remove wire racks from oven and place on heatproof surface. Let
apples stand about 2 hours or until completely dry. Place dried apples on waxed paper. Coat each side with 2 light coats of
spray varnish, following manufacturer's directions.
3. Tie 10-inch cinnamon sticks together. Attach to front of wreath
with 6 inches of the ribbon. Glue dried apple slices and 3 1/2-inch cinnamon sticks to front and side of wreath, using glue
gun. Attach leaves to ribbon on 10-inch cinnamon sticks. Make a bow with the remaining ribbon, and attach to wreath. Attach
wire hanger if desired
. Do-Ahead Tip
Make the dried apples ahead of time. When it's time to make the wreath it
will all come together in a snap.
Purchasing
Pick up Rome apples for this project. With their pretty red skin
and white flesh they are particularly nice in this wreath, though other types of apples are also attractive.
Special
Touch
Throw a holiday tea party when you make this wreath. Enjoy cinnamon-spiced tea and conversation while the apples
are drying. Or dry the apples the day before, and start assembling wreaths as soon as guests arrive. Either way, guests will
enjoy making these apple-and-cinnamon wreaths.
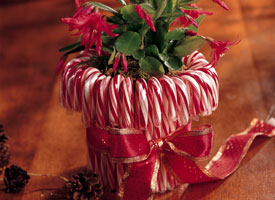
Candy Cane Planter
'Tis the season to get crafting! Make an attractive holiday planter from candy canes and an
ordinary food can.
Prep: 30 min
Start To Finish: 30 min
Makes 1 planter
Glue gun and glue sticks
40 individually wrapped candy canes, 6 inches long
1 empty food can, from tomatoes or fruit (28 to 29 ounces)
1. Pipe glue from hot-glue gun along back of 1 candy cane (in wrapper). Attach to can so that
hook of candy cane is at top of can and curves away from can.
2. Repeat with remaining candy canes to cover side of can.
3. To give as a gift, add a 4-inch potted plant, such as Norfolk Island pine, poinsettia, rosemary,
ivy or Christmas cactus.
Special Touch
Tied with a ribbon, this versatile "planter" can also be filled with cookies,
candy or breadsticks.
Variation
Add a border of wrapped hard peppermint candies, or use a combination of peppermint
sticks and peppermint candies.
Purchasing
Look in the holiday candy section of the grocery store for varieties
of candy canes with both red and green stripes. They’ll add extra holiday spirit to your planter.
Rosettes
Deep-fried cookies? These light, crispy cookies are fried to golden perfection using a special
rosette iron.
Prep: 45 min
Start To Finish: 45 min
Makes 3 dozen rosettes
Vegetable oil
2 tablespoons granulated sugar
1 teaspoon salt
2 eggs
2 tablespoons vegetable oil
1 cup water or milk
1 cup Gold Medal® all-purpose flour
Powdered sugar
Easy Chocolate Glaze, if desired (See Below)
1. Beat sugar, salt and eggs in deep medium bowl on medium speed with
electric mixer. Beat in 2 tablespoons oil, the water and flour until smooth. Heat oil (2 to 3 inches) in 3-quart saucepan
to 400ºF.
2. Heat rosette iron by placing in hot oil 1 minute. Tap excess oil
from iron on paper towels. Dip hot iron into batter just to top edge (don't go over top). Fry about 30 seconds or until golden
brown. Immediately remove rosette; invert onto paper towels to cool. (If rosette is not crisp, batter is too thick; stir in
a small amount of water or milk.)
3. Heat iron in hot oil and tap on paper towels before making each
rosette. (If iron is not hot enough, batter will not stick.) Just before serving, sprinkle with powdered sugar. Or, drizzle
rosettes with Easy Chocolate Glaze.
Easy Chocolate Glaze1/2 cup semisweet chocolate chips
2 tablespoons butter or margarine
2 tablespoons corn syrup
Place chocolate chips, butter and corn syrup in 2-cup microwavable measuring cup. Microwave
uncovered on Medium (50%) 1 to 2 minutes or until chocolate can be stirred smooth
Krumkake
These cookies cook one at a time in a special iron and have a rather unusual name, but there
is nothing unusual about their sweet, delicious taste.
Prep: 2 hr
Start To Finish: 2 hr 35 min
Makes 6 dozen cookies
1 cup sugar
3/4 cup Gold Medal® all-purpose flour
1/2 cup butter or margarine, softened
1/3 cup whipping (heavy) cream
2 teaspoons cornstarch
1 tablespoon vanilla
4 eggs
1. Heat ungreased krumkake iron over medium-high heat on smallest
surface unit of electric or gas range (for electric irons, follow manufacturer's directions). Beat all ingredients until smooth.
Test iron with a few drops of water; if they skitter around, iron is correct temperature.
2. Lightly brush inside top and bottom of iron with shortening or
vegetable oil. Drop 1/2 tablespoon batter onto iron; close gently. Cook about 15 seconds on each side or until light golden
brown. Keep iron over heat at all times. Remove cookie with knife. Immediately roll cookie around roller or handle of large
wooden spoon. Cool on wire rack.
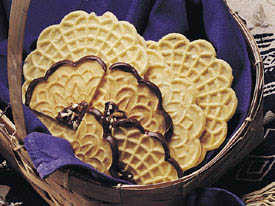
Pizzelles
Dust off that pizzelle iron and get cracking! Light, crispy pizzelles are seconds away with
this easy batter.
Prep: 10 min
Start To Finish: 10 min
Makes 3 1/2 dozen cookies
2 cups Gold Medal® all-purpose flour
1 cup granulated or packed brown sugar
3/4 cup butter or margarine, melted and cooked
1 tablespoon anise extract or vanilla
2 teaspoons baking powder
4 eggs, slightly beaten
1. Heat pizzelle iron following manufacturer's directions. Mix all
ingredients.
2. Drop 1 tablespoon batter onto each design of heated pizzelle iron;
close iron. Bake about 30 seconds or until golden brown. Carefully remove pizzelle from iron. Cool on wire rack. Repeat with
remaining batter.
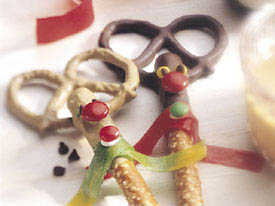
Reindeer Chocolate-Coated Pretzel Rods
The most famous reindeer at your house will be these cute munchable treats!
Prep: 45 min
Start To Finish: 45 min
Makes 12 pretzels
4 ounces chocolate-, vanilla- or butterscotch-flavored candy coating (almond bark), chopped
12 large pretzel twists
12 pretzel rods
24 miniature semisweet chocolate chips
12 red candy-coated chocolate candies
1 roll Betty Crocker® Fruit by the Foot® cherry or other flavor chewy fruit snack rolls
12 miniature green candy-coated chocolate candies
1. Place candy coating in 1-cup microwavable measuring cup. Microwave uncovered on High 30 to
60 seconds, stirring every 15 seconds, until melted.
2. Dip pretzel twists into melted candy coating. Place on waxed paper. Let stand until coating
is set.
3. If necessary, rewarm coating. Dip top 2 inches of pretzel rod into melted candy coating;
attach pretzel rod to bottom of pretzel twist. Place on waxed paper.
4. To make reindeer, press on chcolate chips for eyes and red candy for nose using melted candy
coating. Cut scarf from fruit roll; attach to reindeer using candy coating. Press on green candy for button using candy coating.
Place on waxed paper. Let stand until coating is set. Store coated pretzel rods loosely covered at room temperature no longer
than 2 weeks.
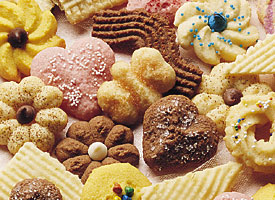
The Ultimate Spritz
These delicate, crisp cookies have a rich, buttery flavor. You often see these cookies at family
celebrations during the winter holidays, but they're perfect for any occasion.
Prep: 25 min
Start To Finish: 35 min
Makes 6 dozen cookies
1 cup butter, softened
1/2 cup sugar
2 1/4cups Gold Medal® all-purpose flour
1/4 teaspoon salt
1 egg
1/4 teaspoon almond extract or vanilla
Food color, if desired
Currants, raisins, candies, colored sugar, finely chopped nuts, candied fruit or fruit peel,
if desired
1. Heat oven to 400ºF. Beat butter and sugar in large bowl with electric mixer on medium speed,
or mix with spoon. Stir in flour, salt, egg, almond extract and a few drops of food color. 2. Place dough in cookie press.
Form desired shapes on ungreased cookie sheet. Decorate with currants.
3. Bake 5 to 8 minutes or until set but not brown. Immediately remove from cookie sheet to wire
rack. To decorate cookies after baking, use a drop of corn syrup to attach decorations to cookies.
Stuffed Stockings
You know you've been good if Santa fills your stocking with these delicious raspberry and chocolate-filled
Christmas treats.
Prep: 1 hr
Start To Finish: 2 hr 50 min
Makes 3 dozen cookies
1 cup sugar
3/4 cup butter or margarine, softened
3/4 cup shortening
1 teaspoon grated orange peel
2 eggs
3 3/4 cups Gold Medal® all-purpose flour
3/4 cup miniature semisweet chocolate chips
1/2 cup raspberry jam
Favorite frosting, if desired
1. Mix sugar, butter, shortening, orange peel and eggs in large bowl. Stir in flour. Divide
dough into thirds. Cover and refrigerate at least 1 hour but no longer than 24 hours.
2. Heat oven to 350ºF. Roll each third of dough into rectangle, 12x9 inches, on lightly floured
surface. Cut each rectangle into twelve 3-inch squares. Mix chocolate chips and jam. Spread 1 teaspoon jam mixture down center
of each square. Bring 2 opposite sides together over jam mixture; pinch to seal. Seal ends and roll gently into rope shape.
Bend into a stocking shape. Place 2 inches apart on ungreased cookie sheet.
3. Bake 15 to 20 minutes or until edges are light brown. Remove from cookie sheet to wire rack.
Cool completely. Decorate with frosting.
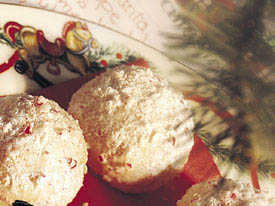
Peppermint Snowball Cookies
'Tis the season for cookie making. Get in the spirit with these festive peppermint cookies that
look like mint-snowballs.
Prep: 20 min
Start To Finish: 1 hr 35 min
Makes 32 cookies
1/4 cup finely crushed peppermint candies (12 candies)
1/4 cup powdered sugar
1 cup butter, softened
1/3 cup powdered sugar
1/4 cup finely crushed peppermint candies (12 candies)
1 teaspoon vanilla
2 1/4 cups Gold Medal® all-purpose flour
1/4 teaspoon salt
1. Heat oven to 325ºF. Mix 1/4 cup crushed candies and 1/4 cup powdered
sugar; reserve. Mix butter, 1/3 cup powdered sugar, 1/4 cup crushed candies and the vanilla in medium bowl. Stir in flour
and salt.
2. Shape dough by level measuring tablespoonfuls into balls. Place about 2 inches apart on ungreased
cookie sheet.
3. Bake 12 to 15 minutes or until set but not brown. Immediately remove
from cookie sheet; roll in reserved candy mixture. Cool completely on wire rack. Roll in candy mixture again.
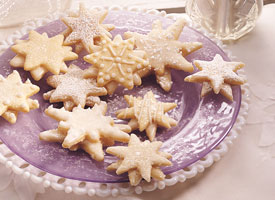
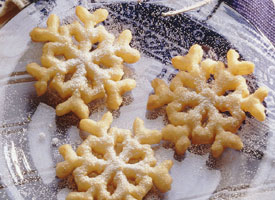
Snowflake Cookies
These delicate sugar cookies are all dressed up with a simple almond glaze and sugar crystals.
Prep: 1 hr
Start To Finish: 2 hr 35 min
Makes 2 1/2 dozen cookies
1 cup granulated sugar
3/4 cup butter or margarine, softened
1 teaspoon vanilla
2 eggs
2 1/2 cups Gold Medal® all-purpose flour
1 teaspoon baking powder
1 teaspoon salt
Almond Glaze (See Below)
White coarse sugar crystals (decorating sugar), powdered sugar or white edible glitter
Easy Decorating Frosting, if desired (See Below)
1. Mix granulated sugar, butter, vanilla and eggs in large bowl. Stir
in flour, baking powder and salt. Cover and refrigerate at least 1 hour but no longer than 24 hours.
2. Heat oven to 400ºF . Roll about one-third of the dough 1/8 inch
thick on lightly floured surface. Cut with 1 1/2-2-inch star-shaped cookie cutter. Place 1 inch apart on ungreased cookie
sheet. Bake about 6 minutes or until light brown. Remove from cookie sheet to wire rack; cool completely, about 30 minutes.
Repeat with remaining dough.
3. Make Almond Glaze. Place cooled cookies together in pairs with
about 1 teaspoon glaze, with points of top cookie between points of bottom cookie. Place cookies on wire rack on cookie sheet
to catch excess glaze. Pour 1 tablespoon glaze evenly over top and sides of each cookie, glazing only a few at time. When
glaze is set but still soft, move cookies to another rack or waxed paper; sprikle with sugar crystals. (Occasionally remove
glaze from cookie sheet, and add a few drops of hot water as necessary to make glaze smooth and thin enough to pour; continue
glazing.)
4. Make Easy Decorating Frosting. Pipe snowflake designs on cookies.
Let cookies dry completely before storing.
Almond Glaze3 cups powdered sugar
4 teaspoons light corn syrup
1/4 cup hot water
1/2 teaspoon almond extract
1/8 teaspoon salt
Mix all ingredients until smooth, glossy and pourable. Easy Decorating Frosting
1 cup powdered sugar
3 to 5 teaspoons water
Mix ingredients to make a frosting that can be easily drizzled or used in a decorating bag,
yet holds its shape.

Reindeer Snack
This delightful mixture of favorite snack foods has a spicy chili powder kick.
Prep: 10 min
Start To Finish: 25 min
Makes 18 servings (1/2 cup each)
3 cups popped popcorn
3 cups Bugles® nacho cheese flavor corn snacks
2 cups pretzel sticks
1 cup Cheerios® cereal
1/3 cup butter or margarine, melted
1/2teaspoon chili powder
1/4 teaspoon garlic powder
1. Heat oven to 300ºF.
2. Mix popcorn, snacks, pretzels and cereal in large bowl. Mix remaining
ingredients; drizzle over popcorn mixture, tossing until evenly coated. Spread in ungreased jelly roll pan, 15 1/2x10 1/2X1
inch.
3. Bake uncovered 15 minutes, stirring twice; cool. Store loosely
covered at room temperature up to 2 weeks. Microwave Directions: Place butter, chili powder and garlic in 3-quart microwavable
casserole or bowl. Microwave uncovered on High about 1 minute or until butter is melted; stir. Stir in popcorn, snacks, pretzels
and cereal. Toss until well coated. Microwave uncovered 6 to 8 minutes, stirring every 2 minutes, until toasted; cool.
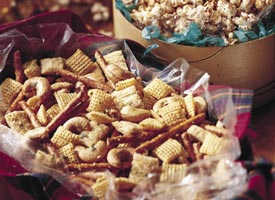
Herbed Cashew Snack Mix
Next time you need to nibble, whip up a batch of this crunchy cereal treat!
Prep: 15 min
Start To Finish: 40 min
Makes 12 servings (1/2 cup each)
2 cups Corn Chex® cereal
2 cups bite-size shredded wheat cereal
2 cups pretzel sticks
1 cup cashews
1/4 cup butter or margarine
1/2 teaspoons dried tarragon leaves
1 teaspoon onion powder
1/4 teaspoon red pepper sauce
1. Heat oven to 325ºF.
2. Mix cereals, pretzel sticks and cashews in ungreased rectangular pan, 13x9x2 inches. Melt
butter in 1-quart saucepan over medium heat; remove from heat. Stir in remaining ingredients. Pour over cereal mixture, tossing
until thoroughly coated.
3. Bake uncovered about 25 minutes, stirring occasionally, until hot. Serve warm or cool
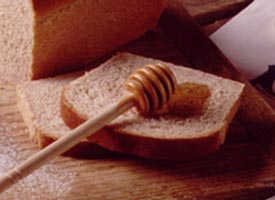
Honey-Whole Wheat Bread
Bring a touch of nostalgia into your kitchen with this updated spin on an old-fashioned favorite.
Prep: 35 min
Start To Finish: 3 hr 10 min
Makes 2 loaves (16 slices each)
3 cups stone-ground whole wheat flour
1/3 cup honey
1/4 cup shortening
1 tablespoon salt
2 packages regular or quick active dry yeast
2 1/4 cups very warm water (120°F to 130°F)
3 to 4 cups Gold Medal® all-purpose flour
Butter or margarine, melted, if desired
1. Mix whole wheat flour, honey, shortening, salt and yeast in large
bowl. Add warm water. Beat with electric mixer on low speed 1 minute, scraping bowl frequently. Beat on medium speed 1 minute,
scraping bowl frequently. Stir in enough all-purpose flour, 1 cup at a time, to make dough easy to handle.
2. Turn dough onto lightly floured surface. Knead about 10 minutes
or until smooth and elastic. Place in greased bowl and turn greased side up. Cover and let rise in warm place 40 to 60 minutes
or until double. Dough is ready if indentation remains when touched.
3. Grease bottoms and sides of 2 loaf pans, 9x5x3 or 8 1/2x4 1/2x2
1/2 inches.
4. Punch down dough and divide in half. Flatten each half with hands
or rolling pin into rectangle, 18x9 inches, on lightly floured surface. Roll dough up tightly, beginning at 9-inch side, to
form a loaf. Press with thumbs to seal after each turn. Pinch edge of dough into roll to seal. Press each end with side of
hand to seal. Fold ends under loaf. Place seam side down in pan. Brush loaves lightly with butter. Cover and let rise in warm
place 35 to 50 minutes or until double.
5. Move oven rack to low position so that tops of pans will be in center of oven. Heat oven
to 375°F.
6. Bake 40 to 45 minutes or until loaves are deep golden brown and
sound hollow when tapped. Remove from pans to wire rack. Brush loaves with butter; cool.

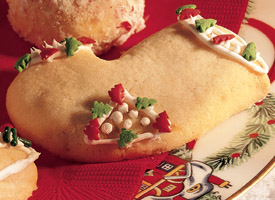
Candy Cane Coffee Cake
Braided and fruit-filled, these shapely coffee cakes are perfect for entertaining or giving
as gifts. This delicious recipe is from the award-winning Betty Crocker’s Best Christmas Cookbook.
Prep: 30 min
Start To Finish: 1 hr 50 min
Makes 3 coffee cakes (12 slices each)
2 packages regular or quick active dry yeast
1/2 cup warm water (105°F to 115°F)
1 1/4 cups buttermilk
2 eggs
5 1/2 to 6 cups Gold Medal® all-purpose flour
1/2 cup butter or margarine, softened
1/2 cup sugar
2 teaspoons baking powder
2 teaspoons salt
1 1/2 cups chopped dried apricots
1 1/2 cups chopped drained maraschino cherries
1. Dissolve yeast in warm water in large bowl. Add buttermilk, sugar,
butter, eggs, baking powder, salt and 2 1/2 cups of the flour. Beat with electric mixer on low speed 30 seconds, scraping
bowl constantly. Beat on medium speed 2 minutes, scraping bowl occasionally. Stir in enough remaining flour to make dough
easy to handle. (Dough should be soft and slightly sticky.)
2. Grease 3 cookie sheets. Turn dough onto well-floured surface; gently
knead about 5 minutes or until smooth and elastic. Divide dough into 3 equal parts. Roll one part into rectangle, 15x9 inches.
Place rectangle on cookie sheet.
3. Mix apricots and chopped cherries. Spread one-third of the apricot
mixture in a strip about 2 1/2 inches wide lengthwise down center of rectangle. Make cuts in dough at 1/2-inch intervals on
both 15-inch sides almost to filling. Fold strips over filling, overlapping and crossing in center. Carefully stretch dough
until 22 inches long; curve one end to form top of cane. Repeat with remaining 2 parts of dough. Cover and let rise in warm
place about 1 hour or until double. (Dough is ready if indentation remains when touched.)
4. Heat oven to 375°F. Bake 20 to 25 minutes or until golden brown.
Decorate with cinnamon candies.
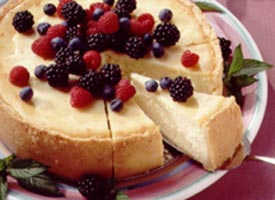
New York Cheesecake
If you love cheesecake (and who doesn’t?), this is a recipe to try. Creamy and sweet,
it’s the gold standard for all cheesecakes!
Prep: 30 min
Start To Finish: 14 hr 45 min
Makes 16 servings
Lemon Crust (See Below)
5 packages (8 ounces each) cream cheese, softened
1 3/4 cups sugar
3 tablespoons Gold Medal® all-purpose flour
1 tablespoon grated orange peel
1 tablespoon grated lemon peel
1/4 teaspoon salt
5 eggs
2 egg yolks
1/4 cup whipping (heavy) cream
3/4 cup whipping (heavy) cream
1/3 cup slivered almonds, toasted, if desired
1. Prepare Lemon Crust.
2. Heat oven to 425ºF.
3. Beat cream cheese, sugar, flour, orange peel, lemon peel and salt
in large bowl with electric mixer on medium speed about 1 minute or until smooth. Beat in eggs, egg yolks and 1/4 cup whipping
cream, beating on low speed until well blended. Pour into baked crust.
4. Bake 20 minutes.
5. Reduce oven temperature to 300°F. Bake about 45 minutes longer
or until center is set. (Do not insert a knife because the hole could cause cheesecake to crack.) Turn off oven and leave
cheesecake in oven 15 minutes. Cool in pan on wire rack 15 minutes.
6. Run metal spatula along side of cheesecake to loosen. Refrigerate
uncovered about 3 hours or until chilled; cover and continue refrigerating at least 9 hours but no longer than 48 hours.
7. Run metal spatula along side of cheesecake to loosen; remove side
of pan. Beat 3/4 cup whipping cream in chilled small bowl with electric mixer on high speed until stiff. Spread whipped cream
over top of cheesecake. Decorate with almonds. Refrigerate any remaining dessert.
Lemon Crust1 cup Gold Medal® all-purpose flour
1/2 cup butter or margarine, softened
1/4 cup sugar
1 tablespoon grated lemon peel
1 egg yolk
Move oven rack to lowest position. Heat oven to 425ºF. Lightly grease springform pan, 9x3 inches;
remove bottom. Mix all ingredients with hands. Press one-third of the mixture evenly on bottom of pan. Place on cookie sheet.
Bake 8 to 10 minutes or until light golden brown; cool. Assemble bottom and side of pan; secure side. Press remaining mixture
all the way up side of pan.

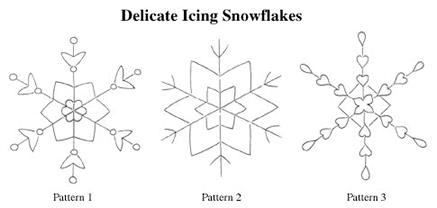
Delicate Icing Snowflakes
These pretty handcrafted snowflakes add elegance to your holiday decor. Use them to decorate
candles for one-of-a-kind gifts.
Prep: 1 hr
Start To Finish: 1 hr
Makes 1 dozen 5-inch snowflakes
4 cups powdered sugar
3 tablespoons meringue powder
6 tablespoons warm water
Small paintbrush
Taper candles, if desired
Glitter, edible glitter or granulated sugar
Nylon thread, string or ribbon
1. Beat powdered sugar, meringue powder and water in large bowl with
electric mixer on low speed until sugar is moistened. Beat on high speed 5 to 7 minutes or until very glossy and stiff peaks
form.
2. Place icing in decorating bag with #10 tip. Or place icing in strong
plastic bag; cut off a tip from one corner of bag. Keep damp paper towel over tip when not in use to prevent icing from hardening.
3. Cover cookie sheet with waxed paper or cooking parchment paper.
Enlarge or reduce patterns (see diagram); slide patterns under waxed paper. Trace patterns by piping on frosting, tracing
longest lines of pattern first. Use a small paintbrush dipped into water to smooth any irregularities, working on each snowflake
as it is piped. For candles, draw snowflakes freehand or use toothpick or pin to etch design before piping icing.
4. Lightly brush entire snowflake with water; immediately sprinkle
with glitter (use only edible glitter or sugar if snowflakes are to be eaten). Let dry; remove from waxed paper. To hang as
decorations, attach nylon thread to one end.
|